Nella lezione che seguiremo vedremo come dare un pochino di consistenza a un disegno piatto di uno spaventapasseri in un campo. In pochi semplici passi e con l’aiuto di Photoshop aggiungeremo texture al suo corpo fatto di tela di sacco, aggiungeremo imbottitura per lo spaventapasseri e un nido d’uccello sul cappello di paglia. Altri dettagli andranno a rifinire la composizione.
Related Posts
28
Oct2015

Yellow Brick Road use Filter Forge and Photoshop
Filter Forge è un plugin per Photoshop che consente di creare i propri filtri. In onore delle celebrazioni del 70esimo del Mago di Oz, quale modo migliore per festeggiarlo so…
07
Dec2017
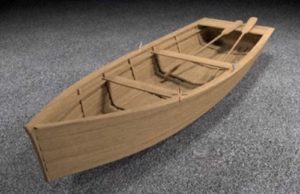
Modeling a Simple Row Boat in Blender
In this interesting video tutorial we will see how to make a beautiful 3D boat using the Open Source Blender polygonal modeling program. A very detailed lesson that illustrates the…
17
May2023

Create Cool Metalic Logo Reveal in After Effects
In this After Effects video tutorial we will create a metallic reflective logo reveal animation without using any plug-ins. we will also cover topics such as logo reveal animation in…
29
Oct2016

Create a Cute Slice Effect in After Effects
In this video tutorial we will see how to create cuts using some effects of the famous video editing program Adobe After Effects. A very detailed and easy to follow…
21
Nov2016

Draw Logo with Isometric Perspective Grid in Illustrator
In this nice video tutorial we will see how to use the isometric view to create a very professional logo in Adobe Illustrator. First of all we are going to…
05
Sep2016

Create Epic Empire Logo Reveal in After Effects
In this beautiful video tutorial we will see how to create an effect to show a logo in a spectacular way using the After Effects graphics program. The exercise uses…